Lisa Cooks

May 8, 2009

I graduated from the California School of Culinary Arts, Le Cordon Bleu program in Hollywood, CA in August of 2008. But that’s not why I started this blog.

Just after finishing culinary school, my Grandma and I started cooking together once a week. She is Armenian so most of what we made was her or my great-grandmother’s recipes from the old country. Lots of instructions “to taste” and “a handful” or “until it feels right”. I had been wanting to write down more accurate recipes, but that’s not the only reason I started this blog either.

In 2008, I decided to use my favorite search engine to look up some of these recipes. There’s a huge Armenian population both in Los Angeles, and in the midwest, believe it or not. I figured there had to be tons of recipes for the dishes I grew up on. I was wrong. I found loads of articles on where to buy Armenian food and describing what it was, but very few recipes. The recipes I did find were completely different from my Grandma’s way of doing things.

My great-grandmother was from a small village in Turkey called Hadjin. She fled during the Armenian genocide at the age of 12 on a boat by herself. That’s a whole other story I may tell someday on here. The reason I mention it now is, Hadjin had its own dialect and, as I’m finding out, its own food. The food is similar to other Armenian and even Greek and Lebanese food, but just enough different that I felt it should be documented somewhere.

Auntie Helen’s Lemon Jello Cake

April 1, 2015

lemoncake

There’s a funny story about how my family got the recipe for this cake from Auntie Helen. We had most of the recipe, but we didn’t know whether to use lemon jello or lemon pudding. Auntie Helen was in the hospital with a tube down her throat and couldn’t speak so we said “Blink once for jello, twice for pudding!”. She was in hysterics thinking it was the funniest thing ever and we found out it was jello. She ended up recovering and living many more years and we all had a big laugh about it together.

For the cake:

1 box lemon cake mix

1/2 cup canola oil

3/4 cup water

4 eggs, beaten

1 small package lemon jello

For the glaze:

2 cups powdered sugar

1/2 cup freshly squeezed meyer lemon juice

Preheat the oven to 350F.

Grease and flour the bottom and sides of a 9×13 cake pan

Mix the oil, water, eggs, and lemon jello together in a mixer. Add in the cake mix and mix on low for 30 seconds. Then mix on medium for 2 minutes.

Pour the batter into the pan and bake for 30-40 minutes, rotating once half way though.

While the cake is baking, mix together the powdered sugar and the lemon juice.

When the cake comes out of the oven, immediately poke holes all over it with a fork and pour the glaze over it, making sure to get it all the way to the edges and all over the cake.

Place the cake into the refrigerator for at least 3 hours, or overnight if you have the time. You can either take it out and eat it, or you can frost it. I don’t think frosting is necessary, but my husband likes it with marshmallow cream cheese frosting.

Marshmallow Cream Cheese Frosting:

Beat one 7oz. jar marshmallow fluff with 8 oz. room temperature cream cheese and 1 tsp. vanilla extract. If you want it a little sweeter, add powdered sugar to taste.

Tapsy (Sou) Boereg

April 1, 2015

boereg

Tapsy Boereg is like Cheese Boereg, but made in a pan instead of into individual pastries. It makes a great appetizer or dinner. Flaky, buttery layers of phyllo dough with melted cheeses are always a crowd pleaser.

1 lb. phyllo dough sheets, defrosted over night in the refrigerator

1 stick salted butter, melted

2 lbs. jack (or pepper jack if you like it spicy) cheese, shredded

1/3 cup small curd whole milk cottage cheese

1/3 cup spreadable cream cheese

1-2 Tbsp. feta cheese

1 egg, beaten

1/4 cup finely chopped parsley (optional)

3 eggs, beaten

1 cup whole milk

First, make the cheese filling by mixing together all the cheeses plus 1 of the beaten eggs and the parsley, if you’re using it. Mix it together with your hands like you would meatloaf until everything is very well incorporated together.

Butter a 9×13 casserole dish very well. Place one sheet of phyllo dough on the bottom, brush with melted butter. Repeat until you have 4 sheets of phyllo dough on the bottom. Now spread a thin layer of the cheese mixture on the phyllo dough. Next, layer 4 more sheets of phyllo dough, buttering each one as you did before. Now more cheese. Repeat layering like this until you run out of phyllo dough or cheese. End with phyllo dough on top.

Get a small sharp knife and cut the boereg into rectangles. It will be impossible to cut after you bake it, so do it now and save yourself some trouble. At this point, you can put it into the refrigerator until you are ready to bake it. If you want to bake it right away, that’s fine too.

Just before baking, mix together the 3 beaten eggs and 1 cup milk. Pour over the boereg and tilt the pan so that the egg mixture gets into every nook and cranny.

Bake at 350 for 1 hour, rotating 180 degrees half way through so it cooks evenly. Let sit 5 minutes on the counter and then enjoy!

Chocolate Banana Bread Pancakes

January 21, 2014

Do I even need to say anything else? They’re chocolate. They’re banana bread. But they’re ready right away because they’re pancakes.

1 egg
1/2 cup sugar
1 tsp. vanilla
2 very ripe bananas
1/2 tsp. cinnamon
2 Tbsp. Unsweetened cocoa powder
1 tsp. baking powder
1/2 tsp. baking soda
1 cup flour
Whole milk

Beat the egg. Add in the sugar, vanilla, and bananas. Whisk to combine well.
Add the cinnamon, cocoa powder, baking powder, and baking soda. Whisk until everything’s combined.
Add in the flour and once again, whisk until combined.
Now add in the milk a little at a time until the batter is the right consistency to make pancakes. I didn’t measure, but I’d guess around 1/2 to 2/3 cup is what I used.

Now place 1/8 cup (2 Tbsp.) batter per pancake on a non-stick skillet on medium low heat. Wait until edges start to bubble, then flip. Cook until done on other side.

I didn’t even need butter or syrup with these, but go ahead and indulge if you want. These would also be good with chocolate chips in the batter or bananas on top or even strawberries. Get creative and enjoy!

Creamy Orange Banana Smoothie

July 20, 2013

This smoothie has changed breakfast time for me. No more bagels or cereal, just this. It tastes like a creamsicle milkshake! It is 8 Weight Watchers plus points.

1 large or two small frozen bananas
2/3 cup fresh orange juice
1 tsp. vanilla extract
5 oz. (1 package) Trader Joes nonfat strawberry Greek yogurt

I cut up my banana and put it in a zip top bag in the freezer the night before. This is essential. Peeling a frozen banana is just about impossible. Learned that the hard way!

Dump everything into the blender and blend at maximum power. Drink up!

A variation on this is a frozen berry smoothie:
1 cup frozen berries
3/4 cup vanilla almond milk
5 oz. vanilla nonfat greek yogurt
This one is 7 WW plus points.

Turkey Chili

July 15, 2013

2 diced onions

2 cloves minced garlic

1 lb. 93/7 ground turkey

One 15 oz. can diced tomatoes with jalapenos (or Rotel)

One 15 oz. can black beans, drained and rinsed

1/2 Tbsp. cumin

1 Tbsp. chili powder

1 Tbsp. dried oregano

salt to taste

tapatio hot sauce to taste

1 cup reduced fat shredded Mexican cheese


Spray a large sauté pan with cooking spray. On high heat, cook 1 of the diced onions with the ground turkey until the turkey is no longer pink.

Add in the garlic, cumin, chili powder, and oregano. Cook 30 seconds.

Add in the can of diced tomatoes with the juice.

Add in the rinsed black beans and a few dashes of tapatio. Stir well and taste for seasoning. Add salt to taste.

Cover and let simmer on low for at least 30 minutes.

Top with the other diced onion and 1 cup shredded cheese


This recipe is 34 Weight Watchers Plus points for the whole thing including the cheese. If you serve it over brown rice, each cup of rice adds 5 points.

Thai Chicken Burgers

April 15, 2011

UPDATE: My husband suggested adding chopped water chestnuts to these burgers and it gave them the crunch and texture they need! I will be using water chestnuts in this recipe from now on.

I was looking online for new recipes using chicken or turkey and I came across this recipe for thai chicken meatballs. It sounded okay, but it needed some additions and changes, in my opinion. Here’s what I did with it.

Mix together the following:

1 lb. ground chicken

1/2 cup plain bread crumbs

1/4 cup chopped green onions

1/2 Tbsp. ground corriander

2 Tbsp. Sriracha Hot Chili Sauce

zest and juice of 1 lime

1 egg

1 large clove garlic, minced

1 inch ginger, grated

1 Tbsp. soy sauce

1 tsp. fish sauce

Form into burgers and cook for 5-6 minutes on each side either on a grill or in a pan on the stove. Top with a little more of the Sriracha sauce if you like it really spicy!

French Onion Risotto

March 31, 2011

Today is my husband’s birthday, but we celebrated with his birthday dinner last night. One of his favorite things that I make is risotto. I was going to just make plain risotto with shallots, garlic, chicken broth and parmesan. It’s a perfectly delicious dish. But then something happened.

Last weekend, my husband made his famous French onion soup. We had his sister and her boyfriend over and we all devoured it. They loved it so much, they wanted the recipe. So he sent it to them yesterday and copied me on the e-mail so I’d have it too. Then it hit me: combine the French onion soup recipe with my risotto recipe. Could it work? I had onions, I had thyme, port, bacon and gruyere left over from when he made the soup. Yep, I could make this happen without a trip to the market! So I did and now I’m sharing the recipe with you.

4 strips of center cut bacon

1 1/2 very large or 3 small onions, diced

2 Tbsp. salted butter

5 cups low fat, low sodium chicken or beef stock (veal stock would be ideal, but it’s hard to come by)

a few sprigs of thyme

1 bay leaf

2 cups arborrio rice

1/4 cup port

1/4 cup balsamic vinegar

1 cup dry vermouth

1/3 cup grated gruyere cheese

parmesan cheese to taste

salt, if needed, to taste

1 Tbsp. heavy cream (optional)

1 tsp. truffle oil

Put the bacon in a large saute pan over medium heat and let the fat render out of it for about 5 minutes on each side, then remove if from the pan. You can either use the bacon for something else, or chop it up and sprinkle it on top of the risotto just before serving.

Turn the heat down to medium low and add the diced onions to the pan with the bacon fat. Cook them slowly for a long time until they are completely soft, a little translucent and starting to brown, stirring every few minutes. This could take a good 30-45 minutes, but it will be worth it. Be patient here, and it will really pay off.

In the meantime, put the stock into a pot and turn on the heat. Add in the thyme sprigs and bay leaf and bring to almost a boil. Turn the heat down to low and cover to keep hot.

Add the butter to the pan with the onions and turn the heat up to medium. Add in the rice and toast it in the fat/onion mixture until it just starts to brown and the grains start to look translucent.  Add in the port, balsamic vinegar and vermouth. Stir until it is all absorbed.

Now you start the process of slowly adding stock and stirring over and over again until your risotto is perfect. Add in 3/4 cup of stock, then stir until it’s completely absorbed. Do not let the rice mixture come to a boil. You want to cook it slowly. Repeat until you’ve used all the stock and the rice is tender, but still has a slight bite to it, al dente.

Add in the cream and the truffle oil, if you’re using it. I highly recommend you use that truffle oil. Yeah, it’s expensive but it will take the risotto from yummy to mind blowing. Now add in the cheese and taste for saltiness. If it needs salt, add it. Mine needed about 1/4 tsp. Eat up and enjoy!

Recipe makes enough for 4 people as a main dish or 6 people as a side dish. There are only two of us, so we have a lot left over. You’re not really supposed to serve left over risotto, but when have I ever followed the rules when it comes to food? I had it for breakfast this morning and it was delicious!

How to Cook a Butt

December 10, 2010

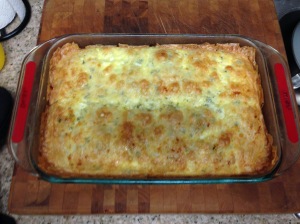
Yesterday, I went to Fresh and Easy and this giant butt was on sale for $2.88. I’ve never cooked a pork butt before, but it was so cheap, I had to buy it.

While I was in the store, I started thinking real hard about what I wanted to go with my butt. I got some onions, garlic, tomato sauce, fire roasted diced tomatoes and whiskey BBQ sauce. I knew I had some Smithwick’s beer at home that I could use too. 

Today I put the butt in the biggest cast iron pot I had, seasoned generously with pepper (no salt!) and then poured all that stuff into the pot and mixed it up.

I covered that pot and put it into a 450F oven for 2 hours. Then I turned the oven down to 200F and left it in another 2 hours. I checked it and there was a lot of liquid, so I took off the cover and put it back in that oven for 2 more hours. It probably only needed another 1/2 hour, but my husband wasn’t home for 2 more hours, so that’s how long it got cooked.

When we finally did eat it, it was tender and delicious and it didn’t need any seasoning! The salt in the tomato products and the BBQ sauce was enough. Unfortunately, I don’t have any pictures of it shredded or pretty on a plate or anything because we were  just too darn hungry and busy eating it!

Cooking this butt was so easy and made a ton of meat. We’ll be eating leftovers this week and I’ll still probably have some left over to freeze. We ate it on hamburger buns like sloppy joes, but you could make BBQ tacos or sandwiches or just eat it with some coleslaw. So the next time you see a giant butt for cheap at the supermarket, don’t be scared of it. Embrace the butt!

Green Curry

October 29, 2010

This recipe for green curry is adapted from one I learned in culinary school. You’ll end up making a ton of paste that you can use several times. It’ll last a few weeks in the refrigerator or even longer in the freezer. Beware – the longer it sits, the hotter it gets!

For the curry paste:

6 Tbsp. ground coriander

4 Tbsp. ground cumin

2 Tbsp. ground black pepper

3 Tbsp. kosher salt

1.5 cups lemon grass

1.5 cups garlic

3/4 cup shallots

4 Tbsp. galangal

Zest of 6 limes

1-2 cups thai green chiles

1.5 cups cilantro

5 Tbsp. shrimp paste

2 Tbsp. fish sauce

juice of 1 lime

12 thai basil leaves

To make the curry paste, get out a food processor and blend everything above together. You’ll probably have to do it in batches. When you’re done, it will look like this:

For the dish:

2 small cans coconut milk

3 small chicken breasts

1 large onion

4 small eggplant

12 thai basil leaves

6 lime leaves

juice of 2 limes

salt to taste

Mix 5 heaping tablespoons of the curry paste with 2 small cans of coconut milk. Set aside. Put the remaining curry paste in the refrigerator or freezer.

Brown the chicken and onions until the chicken is almost cooked. Add in the eggplant. Stir in the coconut milk curry mixture. It should be enough to cover the chicken and veggies at least half way. Add in the thai basil and lime leaves. Please note, the lime leaves are NOT edible. Remove them before you eat! Let the whole thing simmer covered for at least 45 minutes or until the eggplant is done. Take out those lime leaves. Finally, add in the juice of 2 limes. Serve over jasmine rice.

Eggplant Marinara Sauce

September 24, 2010

My friend Heather M. has a garden. Wonderful things come out of this garden. She grows giant zucchini!

The tomato is there for size comparison. It’s not a big tomato or a small tomato, but an average sized tomato. But still – look at the size of that zucchini!

She has also given me peppers, tomatoes and, my favorite, Japanese eggplant.

My Grandma goes to a little produce stand in the North San Fernando Valley (a suburb of Los Angeles) once a month to get the most amazing, flavorful, huge, ripe tomatoes I’ve ever had. Here’s one next to a decent sized head of garlic:

I found myself with a bunch of tomatoes and a bunch of Heather’s Japanese eggplant that were about to go bad. So I decided to roast them with a bunch of other vegetables and make a marinara sauce with them. This sauce is deceptively simple, but has the most wonderful, creamy, hearty texture and delicious, rich, complex flavor.

Here’s what you do! Get out a big sheet pan. Cut 5 or 6 small Japanese eggplant in half. Peel and cut some onions in half (red and white). Cut the very top off a couple of heads of garlic and put them on the sheet pan – skin and all. Put some delicious tomatoes on there too. If you have room, you can also add peppers or any other veggies you feel like sneaking into the sauce. Coat all the veggies in olive oil, mixing them around with your hands. Wipe off your hands and then sprinkle them all generously with salt and pepper.

Pop them into a 450F oven for 40 minutes or until the eggplant are very soft and almost falling apart.

Take the veggies out and let them sit until they are cool enough to handle. Squeeze each garlic clove out of its skin and throw out the skins.

In the meantime, if you want mushrooms or other whole veggies in your sauce, saute them in a little olive oil in a big sauce pan. Now you should add whatever herbs you like: oregano, thyme, rosemary, fennel, and basil are all good. Next, deglaze the pan with a little white wine and cook until the alcohol is mostly cooked off. Now you’re ready to start blending!

Get out your trusty blender or food processor and blend up those roasted veggies in batches. Pour the resulting puree into the sauce pan with the other veggies and herbs. Mix well, taste for salt and add some if you need it. I usually don’t. Heat up and serve over the pasta of your choice with a little bit of a good quality parmesan grated on top. 

This is a great way to get a bunch of vegetables into you (or your kids) without feeling like you just ate a garden. The roasted garlic and eggplant make the sauce extremely rich and creamy, but there’s no fat in it other than the olive oil you roasted the veggies in and the little bit of parmesan cheese you may choose to put on top!